Overview
こんにちは pon です。Elasticsearchで思わぬ挙動にでくわすと、Javaすらやったことのない僕に出来ることはネットの海を彷徨うだけでした。これはよくないと思い、Elasticsearchの仕組みをある程度理解できるように Lucene に入門しました。今回はLuceneのパッケージを利用して簡単な検索エンジンを動かしてみようと思います。Elasticsearch内部でどのようにLuceneを使っているのか知りたい人は必見です。
Lucene とは
https://lucene.apache.org/
Elasticsearchの内部で利用されているオープンソースの検索エンジンライブラリです。あらかじめ蓄積した大量のデータから、指定したキーワードを探し出す機能を持つ。Javaのクラスライブラリとして提供されています。つまりJavaが書ければオレオレ検索エンジンも作れます。
転置インデックス
Luceneは転置インデックスを使った全文検索を採用しています。転置インデックスとは全文検索を行う対象となる文書群から単語の位置情報を格納するための索引データ構造です。
簡単な例をあげると、あるドキュメントD1,D2が次のように与えられると
D1:私は焼肉を食べる
D2:私はサラダも食べる
転置インデックスは下記のように構築できます。

単語を含むドキュメントを検索する際は、転値インデックスからその対象となる単語の行だけを見ればどのドキュメントが検索にヒットするかがわかります。
転置インデックスの構築
では早速Luceneを使って転置インデックスを構築するクラスを実装します。今回使うLuceneは8.6.2を使います。まずは転置インデックスを作成するIndexWriterクラスを初期化します。必要な情報は使用するAnalyzer、インデックスファイルを格納するディレクトリです。
package tutorial;

import java.io.File;
import java.io.FileReader;
import java.io.IOException;
import java.nio.file.Paths;
import org.apache.lucene.analysis.standard.StandardAnalyzer;
import org.apache.lucene.document.Document;
import org.apache.lucene.document.TextField;
import org.apache.lucene.index.CorruptIndexException;
import org.apache.lucene.index.IndexWriter;
import org.apache.lucene.index.IndexWriterConfig;
import org.apache.lucene.store.Directory;
import org.apache.lucene.store.FSDirectory;

public class Indexer {
   private IndexWriter writer;

    // writer の初期化
    // Analyzer、Writerの設定など..
    public Indexer(String indexDirectoryPath) throws IOException {
        Directory directory = FSDirectory.open(Paths.get(indexDirectoryPath));
        StandardAnalyzer analyzer = new StandardAnalyzer();
        IndexWriterConfig config = new IndexWriterConfig(analyzer);
        writer = new IndexWriter(directory, config);
    }

    public void close() throws CorruptIndexException, IOException {
        writer.close();
    }

   // ...
}
IndexWriterクラスはインデックスを作成できるメソッドであるaddDocumentが生えています。これを使ってドキュメントを検索できるようにします。addDocumentにはDocumentクラスを渡す必要があるため、ファイルの情報からDocumentを作成して、addDocumentに渡してあげます。
public class Indexer {
   // ...

   // FileからDocumentを取得
    private Document getDocument(File file) throws IOException {
        Document document = new Document();
        TextField contentField = new TextField("contents", new FileReader(file));
        TextField fileNameField = new TextField("filename", file.getName(), TextField.Store.YES);
        TextField filePathField = new TextField("filepath", file.getCanonicalPath(), TextField.Store.YES);
        document.add(contentField);
        document.add(fileNameField);
        document.add(filePathField);
        return document;
    }

   // fileからdocument生成してwrite
    private void indexFile(File file) throws IOException {
        Document document = getDocument(file);
        writer.addDocument(document);
    }

   // ディレクトリを指定して転値インデックスを作成
    public int createIndex(String dataDirPath) throws IOException {
        File[] files = new File(dataDirPath).listFiles();
        for (File file : files) {
            if(!file.isDirectory() && file.exists() && file.canRead()){
                indexFile(file);
            }
        }
        return writer.numRamDocs();
    }
}
ちなみにTextFieldに渡しているTextField.Store.YESはそのままの文字列を保存できるようにするオプションです。短いメタデータなどを保存するときに有用です。
ここまでを図にするとこんな感じ
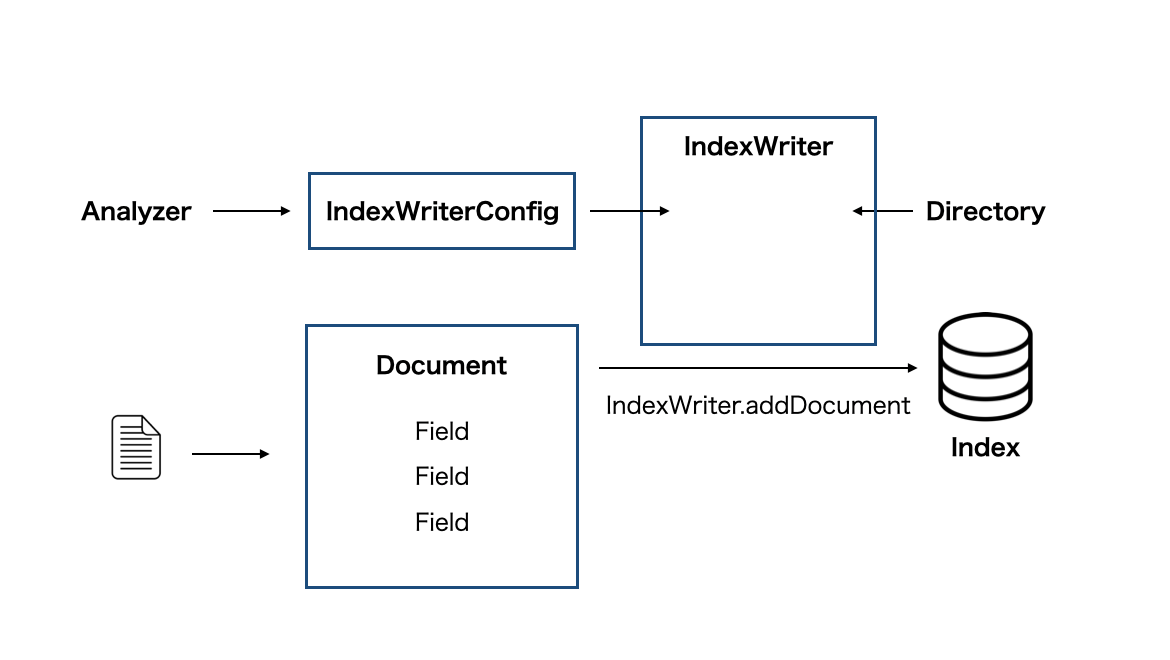
これでローカルのテキストファイルから転置インデックス構築用のクラスができました。早速エントリポイントを作ってこのクラスを使ってみましょう。
package tutorial;

import java.io.IOException;
import org.apache.lucene.document.Document;
import org.apache.lucene.queryparser.classic.ParseException;
import org.apache.lucene.search.ScoreDoc;
import org.apache.lucene.search.TopDocs;

public class TryLucene {
    String indexDir = "./index/"; // インデックスファイル置き場
    String dataDir = "./data/"; // インデックスの元になるテキストファイル置き場
    Indexer indexer;

   // エントリポイント
    public static void main(String[] args) {
        TryLucene tester;
        try {
            tester = new TryLucene();
            tester.createIndex();
        } catch (IOException e) {
            e.printStackTrace();
        } catch (ParseException e) {
            e.printStackTrace();
        }
    }

   // Indexerを利用してindexを生成
    private void createIndex() throws IOException {
        indexer = new Indexer(indexDir);

        int numIndexed = indexer.createIndex(dataDir);
        indexer.close();

        System.out.println(numIndexed+" files indexed");
    }

   // ...
}
これを実行してみます。前もってdataディレクトリを作って適当なテキストファイルを2、3個入れておき、インデックス格納用ディレクトリindexを作っておきましょう。
3 files indexed
3つのドキュメントをインデックスできました。やったー
インデックスの内部
LuceneのFile FormatsについてはApache Lucene - Index File Formatsで定義されています。indexに格納されるdocumentやdocumentに属するfiled、termという概念の説明があります。
A document is a sequence of fields. A field is a named sequence of terms. A term is a sequence of bytes.
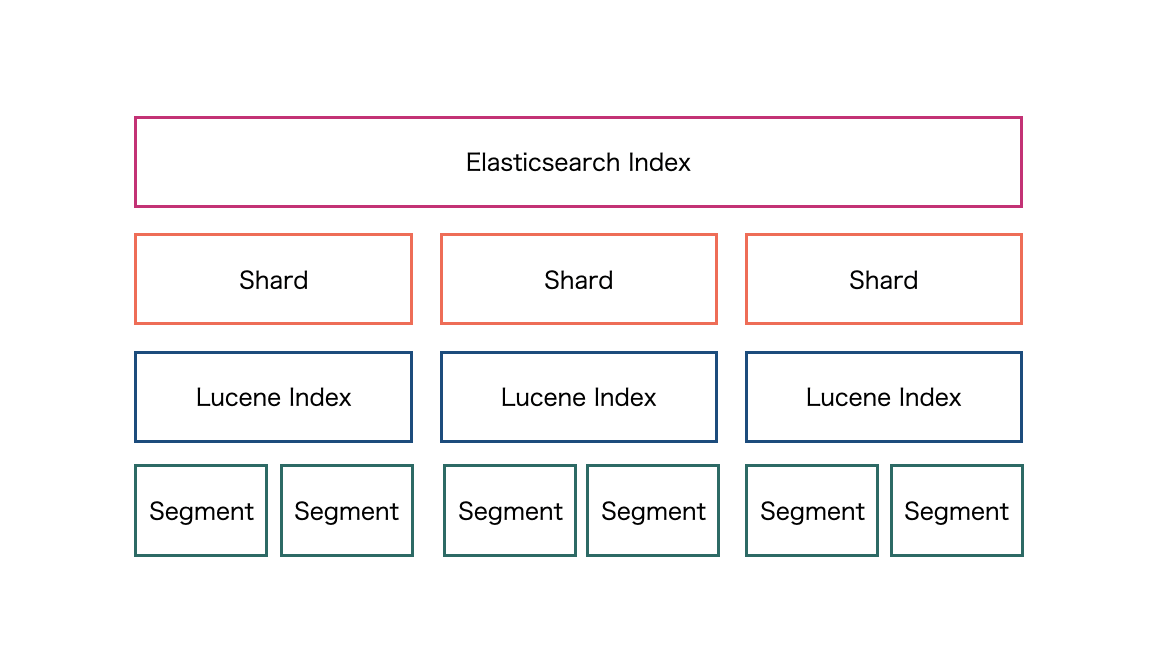
また、Luceneには セグメント という重要な単位があり、インデックスは物理的には一つまたは複数のセグメントから構成されます。各セグメントは完全に独立したインデックスであり、個別に検索できます。ElasticsearchとLuceneのIndexの関係を図にするとShardの単位がLuceneのIndexの単位に相当します。
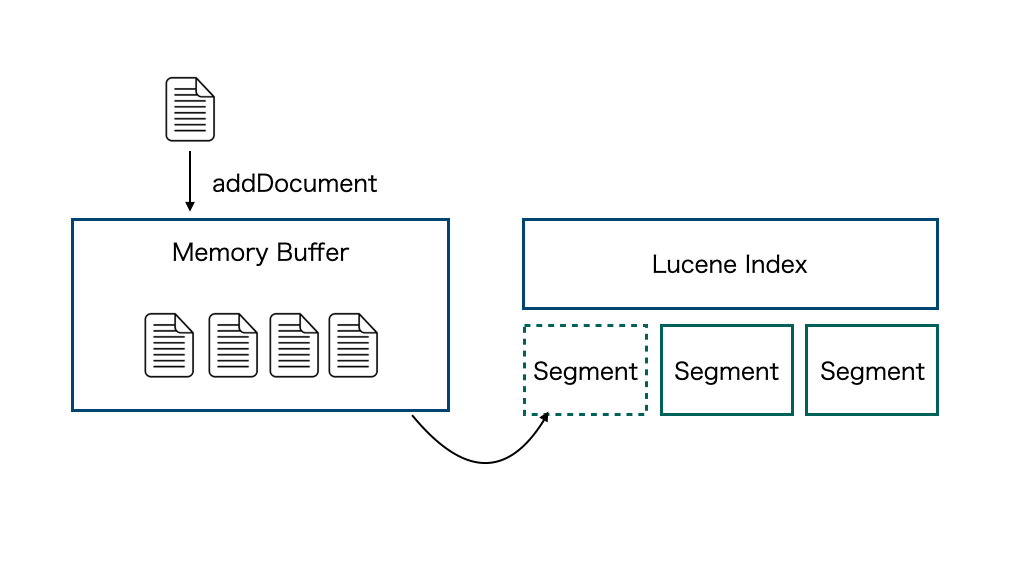
Luceneにドキュメントのインデックスを行うと内部的には下記の順番で処理が進みます。
- 1: メモリバッファにドキュメント追加
- 2: メモリバッファがいっぱいになると新しいセグメントを作成
- 3: セグメントの数が一定になるとセグメントをmergeしていく
1セグメント内のDocumentの最大数やmergeのタイミングなどはLuceneの設定で行えます。IndexWriterConfigに設定を付与していくコード例を下記に示します。
// ...
import org.apache.lucene.index.LogDocMergePolicy;
import org.apache.lucene.index.LogMergePolicy;

public class Indexer {
   private IndexWriter writer;

    // writer の初期化
    // Analyzer、Writerの設定など..
    public Indexer(String indexDirectoryPath) throws IOException {
        // ...

        IndexWriterConfig config = new IndexWriterConfig(analyzer);

         // 一度にマージされるセグメントの数であるマージ係数
        LogMergePolicy policy = new LogDocMergePolicy();
        policy.setMergeFactor(10);
        config.setMergePolicy(policy);

        // メモリバッファに格納できる最大ドキュメント数指定
        config.setMaxBufferedDocs(100);

        writer = new IndexWriter(directory, config);
    }

   // ...
}
先ほどの動作確認でインデックスを作成したものが永続化されているはずなので実際にindexディレクトリの中身をのぞいてみましょう。
tree index
index
├── _0.cfe
├── _0.cfs
├── _0.si
├── segments_1
└── write.lock
なにやらファイルができています。詳細は公式の Index FIle Formats にお任せしますが(自分もまだ勉強中...)、_0という名前はセグメントごとに異なりますので、このファイル群からセグメントが1つ出来ていることがわかります。これはIndexWriterのClose時にメモリバッファに溜まったドキュメントをセグメントとしてまとめて永続化しているためです。もう一度実行すると、当然セグメントがもう1つ作成されていることがわかります。indexディレクトリからもそれが確認できます。
tree index
index
├── _0.cfe
├── _0.cfs
├── _0.si
├── _1.cfe
├── _1.cfs
├── _1.si
├── segments_2
└── write.lock
検索の実装
それでは転置インデックスから単語で検索をやってみましょう。まずはIndexSearcherとQueryParserを初期化します。QueryParserには今回の検索対象フィールドであるcontentsを渡してあげます。
package tutorial;

import java.io.IOException;
import java.nio.file.Paths;
import org.apache.lucene.analysis.standard.StandardAnalyzer;
import org.apache.lucene.document.Document;
import org.apache.lucene.index.CorruptIndexException;
import org.apache.lucene.index.DirectoryReader;
import org.apache.lucene.index.IndexReader;
import org.apache.lucene.queryparser.classic.ParseException;
import org.apache.lucene.queryparser.classic.QueryParser;
import org.apache.lucene.search.IndexSearcher;
import org.apache.lucene.search.Query;
import org.apache.lucene.search.ScoreDoc;
import org.apache.lucene.search.TopDocs;
import org.apache.lucene.store.Directory;
import org.apache.lucene.store.FSDirectory;

public class Searcher {

    IndexSearcher indexSearcher;
    QueryParser queryParser;
    Query query;

    // indexSearcher, queryParserなどを初期化
    public Searcher(String indexDirectoryPath) throws IOException {
        Directory indexDirectory = FSDirectory.open(Paths.get(indexDirectoryPath));

        // IndexSearcher
        IndexReader reader = DirectoryReader.open(indexDirectory);
        indexSearcher = new IndexSearcher(reader);

        // QueryParser
        queryParser = new QueryParser("contents", new StandardAnalyzer());
    }

      // ...
}
では実際の検索を行うメソッドを作ります。searchは渡されたStringからqueryを作り、実際に検索を行います。getDocumentはドキュメントの情報をIDから取得するメソッドです。
public class Searcher {
	// ...

    // クエリをパースしてsearchの実行
    public TopDocs search(String searchQuery) throws IOException, ParseException {
        query = queryParser.parse(searchQuery);
        return indexSearcher.search(query, 10);
    }

    // documentを取得
    public Document getDocument(ScoreDoc scoreDoc) throws CorruptIndexException, IOException {
        return indexSearcher.doc(scoreDoc.doc);
    }
}
これで検索の準備ができました!
動作確認
それでは転置インデックスの動作確認で作ったTryLuceneクラスを少し修正します。
// ...

public class TryLucene {
    // ...

    Searcher searcher; // 追加!!!

    // エントリポイント
    public static void main(String[] args) {
        TryLucene t;
        try {
            t = new TryLucene();
            t.createIndex();
            t.search("clock"); // 追加!!! 「clock」という単語を検索
        } catch (IOException e) {
            e.printStackTrace();
        } catch (ParseException e) {
            e.printStackTrace();
        }
    }

    // メソッド追加!!!
    private void search(String searchQuery) throws IOException, ParseException {
        searcher = new Searcher(indexDir);
        TopDocs hits = searcher.search(searchQuery);
        System.out.println(hits.totalHits + " documents found");

        for(ScoreDoc scoreDoc : hits.scoreDocs) {
            Document doc = searcher.getDocument(scoreDoc);
            System.out.println("File: "
            + doc.get("filepath"));
        }
    }
}
これで全ての実装を終えました!インデックス構築、検索をやってみます。
2 hits documents found
File: /path/to/tutorial/data/test2.txt
File: /path/to/tutorial/data/test3.txt
できたー!!検索に成功しました!!
まとめ
Luceneを使った転置インデックス構築、簡単な検索を実装できました。Elasticsearchの挙動を調査したいときはだいたいLuceneにぶち当たるので、Luceneに慣れておくとElasticseearchともっと仲良くなれそうです。個人的には今後Highlighterの実装も調査していきたいと思います。